you want your domains to be clean then the fluent
validation is best preference.

Let s start now:
Step 1 : Create new web application and select mvc
template , and install entity frame work and fluent validationsi from Package manager.


Step 2: Next in the model folder add Student class
using System;
using System.Collections.Generic;
using System.Linq;
using System.Web;

namespace MvcModelValidation.Models
{
    public class Student
    {
        public int ID { get; set; }
        public string FirstName { get; set; }
        public string LastName { get; set; }
        public string Phone { get; set; }
        public string Email { get; set; }
    }
}
Step3: Next we are going to create class that is derived from DbContext class, you can think it as gateway to the database. add new class StudentContext
inside DAL folder.
using MvcModelValidation.Models;
using System;
using System.Collections.Generic;
using System.Data.Entity;
using System.Linq;
using System.Web;

namespace MvcModelValidation.DAL
{
    public class StudentContext : DbContext
    {
        public StudentContext()
        : base("Stdb")
        {
            Database.SetInitializer<StudentContext>(null);
        }

        public DbSet<Student> Students { get; set; }
    }
}
Step 4: Now create folder in the root of the project and add studentvalidation class. As we can see our student validation class inherits AbstractValidator, this class allows us to define set of validation rules.
using FluentValidation;
using MvcModelValidation.Models;
using System;
using System.Collections.Generic;
using System.Linq;
using System.Web;

namespace MvcModelValidation.Validations
{
    public class StudentValidation : AbstractValidator<Student>
    {
        public StudentValidation()
        {
            RuleFor(s => s.FirstName).NotEmpty().Length(0, 12);
            RuleFor(s => s.LastName).NotEmpty().Length(1, 10);
            RuleFor(s => c.Phone).Length(10).WithMessage("Enter valid number");
            RuleFor(s => s.Email).EmailAddress();
        }
    }
}
Step 5: Add connection string in Web Config
file located in the root of the project.
=<connectionStrings>
      <add name="stdb" providerName="System.Data.SqlClient" connectionString="Data Source= MMC-PC\SQLEXPRESS;Initial Catalog=stdb;Integrated Security=True;" />
  </connectionStrings>
Step 6: Next add a new controller, in our controller we are only working with two actions one for using as input and other for displaying data passed with no validation errors.
using System;
using System.Collections.Generic;
using System.Data;
using System.Data.Entity;
using System.Linq;
using System.Net;
using System.Web;
using System.Web.Mvc;
using MvcModelValidation.DAL;
using MvcModelValidation.Models;
using MvcModelValidation.Validations;
using FluentValidation.Results;

namespace MvcModelValidation.Controllers
{
    public class StudentsController : Controller
    {
        private StudentContext db = new StudentContext();

        //Get Students
        public ActionResult Index()
        {
            return View(db.Students.ToList());
        }

        // GET: Students/Create
        public ActionResult Create()
        {

            return View();
        }

        [HttpPost]
        [ValidateAntiForgeryToken]
        public ActionResult Create([Bind(Include = "ID,FirstName,LastName,Phone,Email")] Student student)
        {
            StudentValidation val = new StudentValidation();
            ValidationResult model = val.Validate(student);
            if (model.IsValid)
            {
                db.Students.Add(student);
                db.SaveChanges();
                return RedirectToAction("Index");
            }
            else
            {
                foreach (ValidationFailure _error in model.Errors)
                {
                    ModelState.AddModelError(_error.PropertyName, _error.ErrorMessage);
                }
            }


            return View(student);

        }


    }
}
Step 7: Now we need to enable migrations to prepare to our database, run the
following commands in package manager console, but before you do build the
project to check it’s running without errors.
enable-migrations
add-migration "initial-migration"
update-database -verbose
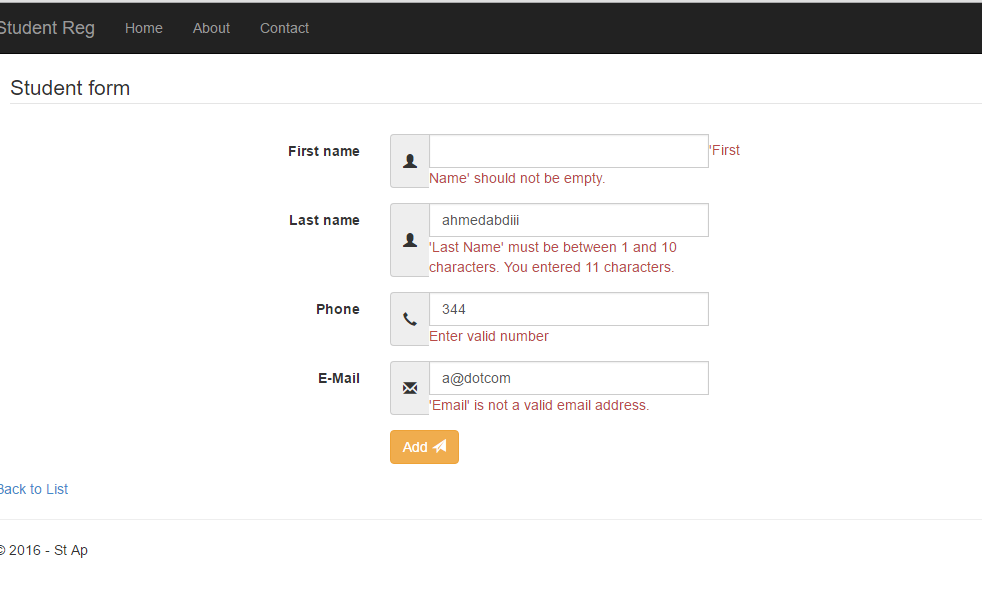
Now we have done, our database is created , lets fire our application. and insert some invalid data.
Now insert valid data

You can get source code from here
Thank you so much for your reading! if you have any complaint or suggestion about the code or the article, please let me know. Don't forget leaving your opinion in the comments section bellow. :)


0 comments:
Post a Comment