In this article we are going to learn how to build an API with asp.net core.
Web api is framework that allows us to build web or http based
endpoint. If you are building services today for mobile, HTML 5, and even
client-server desktop applications, all these different types of applications
need services in the backend to perform a data. In this post we will create web
api to perform create, read, update and Delete operations.
Agenda
- Designing the Resource URIs
- Creating Web api Project
- Adding Entities
- Adding DbContext
- Creating the Repository
- Dependency Injection
- Setting up connection
string
- Enabling migrations
- Adding view models and
mapping with an automapper
- Creating the Controllers
- Adding Security
- Conclusion
Designing Resource URls
We are going to design the outer layer contract; first a resource
name in URI should be noun. We have dishes resource and if we use GET method we
should get a collection of dishes. To get specific dish or dish category we
will include the dishId or category. The
last thing we need is the comments resource, it has its own controller but in
order to post a comment we have to get specific dish.
Perquisites
- NET core SDK version 1.1
- Visual studio code..
- Postman tool
Step 1- Open with command prompt, type mkdir
confusionrestaurant , and again type dotnet new webapi,
to create an asp.net core web api template. You might see that there are already some
files generated by template; we will discuss these files later, but now let’s
restore packages by typing dotnet restore
Program.cs
The program.cs file is in the root of project, and if you look closely it starts with
void main and that’s the starting point of console app. So what the file is
actually doing is that it creates a new webhostbuilder
and then running the webhost to start listening the requests. It also instantiate
a class called startup, and the startup class is
where to setup how to answer the request.
Startup.cs
In startup.cs file there are two main methods (configureServices and
Configure), ConfigureServices is going to
setup the dependency injection in asp.net core, and Configure
method is used to specify how
aspe.net core will respond to individual HTTP requests. First we are going to
change the public Configuration object to private field config, and register it
as Singleton in the Configureservices.
.csproj
If you are using .NET core before, you might see csproj file In the root of project Microsoft has
depreciated the project.json and adopted leaner version of csproj.
Step 2-
Adding Entities
Firstt add entities
folder and next add a new class and name it a Dish Class
    public class Dish
    {
        public int DishId { get; set; }
        public string DishName { get; set; }
        public string DishLabel { get; set; }
        public string Category { get; set; }
        public decimal Price { get; set; }
        public string Description { get; set; }
        public string ImageUrl { get; set; }
        public ICollection<Comment> Comments { get; set; }
    }
- Add new class and
name it a Comment
    public class Comment
    {
        public int Id { get; set; }
        public int Rating { get; set; }
        public string DishComment { get; set; }
        public string Author { get; set; }
        public DateTime date { get; set; }
        public CrUser User { get; set; }
        public Dish Dish { get; set; }
    }
We are going to extend the asp.netUsers table to include the first name and last name. Add new class and name it CR user. Make sure you
included Microsoft.ASP.NET.Core.Identity in csproj file
    public class CrUser : IdentityUser
    {
        public string FirstName { get; set; }
        public string LastName { get; set; }
    }
Step 3- Next we are going to add a database context
class which will be responsible to communicate with database, so add new class
and name it as CrContext , this class is derived from IdentityDbContext.
public class CrContext : IdentityDbContext
    {
        private IConfigurationRoot _config;
        public CrContext(DbContextOptions options,IConfigurationRoot
 config)
        :base(options)
        {
            _config = config;
        }
        public DbSet<Dish> Dishes {get; set;}
        public DbSet<Comment> Comments {get; set;}

        protected override void  OnConfiguring(DbContextOptionsBuilder
 optionsBuilder)
        {
         base.OnConfiguring(optionsBuilder);
        optionsBuilder.UseSqlServer(_config["Data:ConnectionString"]);
        }
    }
Step 4
Creating the Repository
- Add Repository interface.
 public interface  ICrRepository
    {
        //Basic Db Operations
        void Add(T entity) where T:class;
        void Delete(T entity) where T:class;
        Task SaveAllAsync();
       // Dishes
        IEnumerable<Dish>GetDishes();
        IEnumerable<Dish> GetDishByCategory(string category);
        Dish GetDish(int id);
         Dish GetDishWithComments(int id);
        //Cr user
        CrUser GetUser (string userName);
    }
- Add the concrete
class that implement the interface.
    public  class CrRepository :ICrRepository
    {
      private readonly CrContext _context;
      public CrRepository(CrContext context)
      {
          _context = context;
      }
        public void Add<T>(T entity) where T : class
        {
            _context.Add(entity);
        }
        public void Delete<T>(T entity) where T : class
        {
            _context.Remove(entity);
        }
        public IEnumerable<Dish> GetDishes()
        {
           return _context.Dishes.ToList();
        }
        public Dish GetDishWithComments(int id)
        {
            return _context.Dishes
                .Include(d => d.Comments)
                .Where(d =>d.DishId==id)
                .FirstOrDefault();
        }
        public Dish GetDish(int id)
        {
            return _context.Dishes
                .Where(d =>d.DishId==id)
                .FirstOrDefault();
        }
        public async Task<bool> SaveAllAsync()
        {
            return(await _context.SaveChangesAsync())>0;
        }
        public IEnumerable<Dish> GetDishByCategory(string category)
        {
            return _context.Dishes
                         .Where(c => c.Category.Equals(category,
                          StringComparison.CurrentCultureIgnoreCase))
                         .OrderBy(d => d.DishName)
                         .ToList();
        }

        public CrUser GetUser(string userName)
        {
           return _context.Users
                .Include(u => u.Claims)
                .Include(u => u.Roles)
                .Where(u => u.UserName == userName)
                .Cast<CrUser>()
                .FirstOrDefault();
        }
    }
Step 6- We are going to seed the database when we first
fire up the application. Let’s create CR Initializer class, and what it actually does is
that it does a quick query to the database, and if there are no data in
database it assumes it’s empty and it will seed the database.
 public class CRInitializer
    {
        private CrContext _ctx;
        private UserManager _userMgr;
        private RoleManager _roleMgr;

        public CRInitializer(UserManager userMgr,
                              RoleManager roleMgr,
                              CrContext ctx)
        {
            _ctx = ctx;
            _userMgr = userMgr;
            _roleMgr = roleMgr;
        }

        public async Task Seed()
        {
            var user = await _userMgr.FindByNameAsync("ahmedabdi");

            if (user == null)
            {
                if (!(await _roleMgr.RoleExistsAsync("Admin")))
                {
                    var role = new IdentityRole("Admin");
                    role.Claims.Add(new IdentityRoleClaim()
                    {
                        ClaimType = "IsAdmin",
                        ClaimValue = "True"
                    });
                    await _roleMgr.CreateAsync(role);
                }
                user = new CrUser()
                {
                    UserName = "ahmedabdi",
                    FirstName = "Ahmed",
                    LastName = "Abdi",
                    Email = "aabdi417@gmail.com"
                };

          var userResult = await _userMgr.CreateAsync(user, "Ahm3dia@!");
          var roleResult = await _userMgr.AddToRoleAsync(user, "Admin");
          var claimResult = await _userMgr.AddClaimAsync(user,
                                 new Claim("SuperUser", "True"));

   if (!userResult.Succeeded || !roleResult.Succeeded
                      || !claimResult.Succeeded)
          {
           throw new InvalidOperationException("Failed to build user or role");
          }
        }

            if (!_ctx.Dishes.Any())
            {
                _ctx.AddRange(_sample);
                await _ctx.SaveChangesAsync();
            }
        }
        List<Dish> _sample = new List<Dish>
        {
                    new Dish()
                    {
                        DishName = "Vadonut",
                        DishLabel = "Hot",
                        Category = "appetizer",
                        Price = 1,
                        Description = "A quintessential ConFusion experience,
                            is it a vada or is it a donut?",
                        ImageUrl = "/images/vadonut.jpg",
                    },
// Code Omitted
}
I have omitted some
of Dish Object for brevity but you can download the project at bottom of the post.
Step 7
Dependency Injection
Next we are going to register the repository, in the startup.cs
and inside the configureservices method we added the interface and concrete class
as scoped dependency, and if you look the concrete class
CrRepository you can see that it needs CrContext which
is dbcontext object from Entity framework, let’s register it. The next thing we
are going to do is to register CRInitializer as transient. However to run CRInitializer
we need to configure it, in ConfigureMethod , first we added it to the list of parameters and called Seed which is awaitable task. Next we added the Identity
in service collection and then configure it in ConfigureMethod by using
UseIdentity before the UseMVC because we want to protect the mvc request from
unauthorized or unauthenticated users. For
more information about DI see
here.
        // This method gets called by the runtime. Use this method to add services to the container.
        public void ConfigureServices(IServiceCollection services)
        {
            services.AddSingleton(_config);
            services.AddDbContext<CrContext>(ServiceLifetime.Scoped);
services.AddScoped<ICrRepository, CrRepository>();
services.AddTransient<CRInitializer>();
services.AddIdentity<CrUser, IdentityRole>()
                    .AddEntityFrameworkStores();
            services.AddAutoMapper();
            // Add framework services.
            services.AddMvc();
        }
       // This method gets called by the runtime. Use this method to configure the HTTP request pipeline.
        public void Configure(IApplicationBuilder app,
                             IHostingEnvironment env,
                             ILoggerFactory loggerFactory,
                             CRInitializer seeder)
        {
            loggerFactory.AddConsole(_config.GetSection("Logging"));
            loggerFactory.AddDebug();
            app.UseIdentity();
            app.UseMvc();
            seeder.Seed().Wait();
        }
Step 8- Next
we are going to Add the connection string in appsetting.json file, I’am using
sql server express 2014, so you may need
to change the name of the server if you aren’t already installed it.
"Data": {
    "ConnectionString": "Data Source=.\\SQLEXPRESS;Initial
                         Catalog=confusionresturantDb;
                         Integrated Security=True;
                        Connect Timeout=30;
                        Encrypt=False;TrustServerCertificate=True;
                        ApplicationIntent=ReadWrite;
                        MultiSubnetFailover=False"
  },
Step 9 - To work with migrations in CLI, let’s first
add
Microsoft.EntityFramworkCore.Tools.DotNet
Package in .csproj file.
dotnet ef migrations add init
dotnet ef database update
Step 10 :
Adding a View Models
If we send GET request later
when we Create DishesController and CommentController
classes, the response returns all the fields of the dish and the comment. I want to get rid of unnecessary fields, so
how do I do this? We will add new classes
and name as a DishModel and CommentModel , so that the Controller will return the
DishModel or CommentModel rather than
entities. The next thing we’re going to do is to map the entities to
models, we will first add an extension to automapper in csproj file
Now In the startup.cs file under the configureMethod we will add new
service
services.AddAutoMapper();
In the models folder add new class and name it a DishModel
.
  public class DishModel
    {
        public string DishName { get; set; }
        public string DishLabel { get; set; }
        public decimal Price { get; set; }
        public string ImageUrl { get; set; }
    }
Add new
class and name it a CommentModel.
 public class CommentModel
    {
        public int CommentId { get; set; }
        public string Rating { get; set; }
        public string DishComment { get; set; }
        public DateTime date { get; set; } = DateTime.Now;
        public string Author { get; set; }
    }
Add new
class and name it DishMappingProfile
    public class DishMappingProfile : Profile
    {
       public DishMappingProfile()
       {
           CreateMap()
           .ReverseMap();

           CreateMap()
            .ForMember(m => m.Author,
opt => opt.ResolveUsing(u =>
                    u.User.UserName.ToString()))
            .ReverseMap();
       }
    }
HTTP
Methods First,
reading a resource, we use Get method. For creating a new resource we use POST method and if we want to update resource two
options are available, the first one is PUT which
is used for full updates, for example a put request to
/api/dishes/dishId would update
dish with that ID and if field is
missing it will be empty in the response, but if you need to partially update to resource then we will use PATCH method. The last http method we need is DELETE method and it’s used to delete an existing
resource.
Step 11:
Creating the Controllers
Now we are going to add new class “DishesController”
and pass the dependencies in the constructor parameters.
  [Route("api/[controller]")]
     public class DishesController : Controller
     {
        private readonly ICrRepository _repo;
        private readonly IMapper _mapper;
        public DishesController(ICrRepository repo , IMapper mapper)
        {
            _repo= repo;
            _mapper = mapper;
        }
  [HttpGet("")]
       public IActionResult Get()
       {
        var dishes = _repo.GetDishes();
        return Ok(Mapper.Map<IEnumerable<DishModel>>(dishes));
       }
Step 13 :
    [HttpGet("{id:int}", Name = "DishGet")]
       public IActionResult Get(int id)
       {
           try
           {
            var dish = _repo.GetDishWithComments(id);
            if(dish == null) return NotFound($"Dish of {id} was
                                                not found");
            return Ok(dish);
           }
           catch(Exception)
           { }
           return BadRequest("Could not found Dish");
       }
Step 14 :
 [HttpGet("{category}")]
      public IActionResult GetCategory(string category)
      {
          try
          {
            var dish = _repo.GetDishByCategory(category);
            return Ok(Mapper.Map<IEnumerable<DishModel>>(dish));
          }
          catch(Exception)
          {
          }
          return BadRequest("Couldn't found dish");
      }
Step 15 :
        [HttpPost]
       public async Task<IActionResult> Post([FromBody] Dish model)
       {
          try
          {
              if(!ModelState.IsValid) return BadRequest(ModelState);
              _repo.Add(model);
              if( await _repo.SaveAllAsync())
              {
            var newUri = Url.Link("DishGet", new{id = model.DishId});
               return Created(newUri, model);
              }
          }
          catch(Exception)
          { }
          return BadRequest("Could not post Dish");
       }
Step 16:
    [HttpPut("{id}")]
       public async Task<IActionResult> Put (int id,
                                  [FromBody] DishModel model)
       {
           try
           {
            if(!ModelState.IsValid) return BadRequest(ModelState);
            var oldDish = _repo.GetDish(id);
            if(oldDish == null) return NotFound($"Couldn't find a dish
                                                  of {id}");
            _mapper.Map(model, oldDish);

            if (await _repo.SaveAllAsync())
            {
                return Ok(_mapper.Map<DishModel>(oldDish));
            }
           }
           catch(Exception)
           {}
           return BadRequest("Could not update dish");
       }
Step 17:
        [HttpDelete("{id}")]
       public async Task<IActionResult> Delete(int id)
       {
        try
        {
          var oldDish = _repo.GetDish(id);
          if(oldDish == null) return NotFound($"Could not found Dish
                                                   of id {id}");
          _repo.Delete(oldDish);
          if(await _repo.SaveAllAsync())
          {
              return Ok();
          }
        }
        catch(Exception)
        { }
        return BadRequest("Could not Delete Dish");
       }
Step 18:
Now we are going to
add CommentsController and in this controller
class, we are only working with post method in order to add comments. We also added
an authorize attribute because we want to check the user is authenticated.
 [Route("api/dishes/{id}/comments")]
    public class CommentController : Controller
    {
        private ICrRepository _repo;
        private IMapper _mapper;
        private ILogger _logger;
        private UserManager _userMgr;

        public CommentController(ICrRepository repo,
                                IMapper mapper,
                                ILogger logger,
                                UserManager userMgr)
        {
            _repo = repo;
            _mapper = mapper;
            _logger = logger;
            _userMgr = userMgr;
        }
        [HttpPost]
        [Authorize]
        public async Task Post(int id, [FromBody] CommentModel model)
        {
            try
            {
                var dish = _repo.GetDish(id);
                var comment = _mapper.Map(model);
                comment.Dish = dish;
                var crUser = await _userMgr.FindByNameAsync(this.User.
                                                   Identity.Name);
                if (crUser != null)
                {
                    comment.User = crUser;
                    _repo.Add(comment);
                    if (await _repo.SaveAllAsync())
                    {
                        var url = Url.Link("CommentGet",
                           new { id = model.CommentId });
                        return Created(url, _mapper.Map(comment));
                    }
                }
            }
            catch (Exception ex)
            {
  _logger.LogError($"an error accured while posting comment {ex}");
            }
            return BadRequest("Could not post comment");
        }
    }
Step 19:
Adding Security
If we run the application and access the actions we added the
authorize attribute, we should get 401 (Unauthorized),
so that in here we are going to add login functionality. Add new class in models
folder and name it a Loginmodel
    public class LoginModel
    {
        [Required]
        public string UserName { get; set; }
        [Required]
        public string Password { get; set; }
    }
Now we are going to add new controller, add new class, named
auth controller .
  public class AuthController : Controller
    {
        private CrContext _context;
        private SignInManager _signInMgr;
        private ILogger _logger;

        public AuthController(CrContext context,
SignInManager signInMgr,
                                ILogger logger)
       {
           _context = context;
           _signInMgr = signInMgr;
           _logger = logger;
       }
       [HttpPost("api/Auth/login")]
       public async Task  Login ([FromBody] LoginModel model)
       {
         try
         {
        var result = await _signInMgr.PasswordSignInAsync(
               model.UserName , model.Password, false, false);
        if(result.Succeeded)
        {
            return Ok();
        }
         }
         catch(Exception ex)
         {
   _logger.LogError($"an Exception is thrown while logging in {ex}");
         }
         return BadRequest("Failed to login");
       }
    }
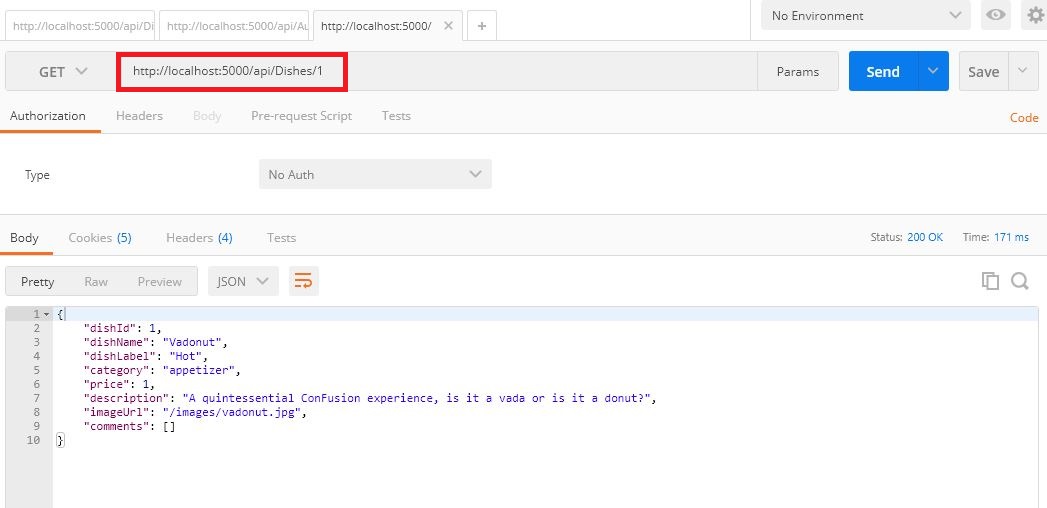
Step 17: Now lets run the application and open the
postman, copy
http://localhost:5000/api/Dishes to Postman

Get Dish categor.y.

Get Dish.

Inserting Dish.
Updating Dish
Now we are going to update the price from 4 to 5.
Conclusion
In this article we
learned how to create a web api with asp.net core, first we started with data
layer and then created simple web api project that has the CRUD functionality. I hope this article is very useful for all readers.
source code